Friday, December 19, 2014

How To Read Windows Crash dmp Files (Pretty Cool Method)

Recently had to figure out why a Windows 2008 R2 server was crashing. Which meant reading crash dump files and to read crash dump files you need the Debugging Tools for Windows.

Download and install Windows 8 SDK Debugging Tools Windows. The install will require and Internet connection to download the packages it needs.

All you need to install is the “Install Debugging Tools for Windows as a Standalone Component (from Windows SDK)” and during the install only select “Debugging Tools for Windows“.  
Everything else is used for more advanced troubleshooting or development, and isn’t needed here.

Next, from an elevated command prompt navigate to the debugging folder. For me with the latest tools on Windows 7 it was at C:\Program Files (x86)\Windows Kits\8.0\Debuggers\x64\.

Type the following:

c:\> cd "C:\Program Files (x86)\Windows Kits\8.0\Debuggers\x64\"
c:\> kd –z C:\Temp\memory.dmp (or the path to your .dmp file)
 
Type the following:

kd> .logopen c:\temp\debuglog.txt
 opened log fil `c:\temp\debuglog.txt`
 
Now we need to tell it where the symbols live at, type the following:
kd > .sympath srv*c:\symbols*http://msdl.microsoft.com/download/symbols
 Symbol search path is: srv*c:\symbols*http://msdl.microsoft.com/download/symbols
Expanded Symbol search path is: srv*c:\symbols*http://msdl.microsoft.com/download/symbols
 
Now reload it and update the debuglog.txt, type the following:

kd> .reload;!analyze -v;r;kv;lmnt;.logclose;q
 
Review the results by opening c:\temp\debuglog.txt in your favorite text editor. 

Searching for PROCESS_NAME: will show which process had the fault.  You can use the process name and other information from the dump to find clues and find answers in a web search.

Finding the World Wide Name (WWN) in Windows Server 2008 and 2008 R2


Finding the World Wide Name (WWN) in Windows Server 2008 and 2008 R2


You know how it is, you just built that new server and you need to attach storage to the Qlogic or Emulex card and the storage guys are asking for the WWN (World Wide Name) and if this is a first time you start to scratch your head, no worries because Microsoft has added that little piece of info right at your finger tips.

In Windows Server 2008 or 2008 R2, you can use “Storage Explorer” to show the WWN.

  • Open MMC (Microsoft Management Console)
  • Click File > Add / Remove Snapin.
  • Find Storage Explorer and double-click to add the snapin. Click ok to save and go back to the screen. The system will scan for adaptors.
  • Please wait for 2 mins so that the Adapter will get initialized and show up there.
  • Expand Servers > <Server Name>.
  • Click on the adaptor and the information will be displayed.


How To Span Volumes on Windows 2008 R2 Using Dynamic Disks


How To Span Volumes on Windows 2008 R2 Using Dynamic Disks


This how to explains how span volumes using SAN attached drives on Windows 2008 R2.

When using SAN drives and you want to extend the space you can span the volume, but this is only available to Dynamic Disk’s.
If the disk is basic, you need to convert it to dynamic.
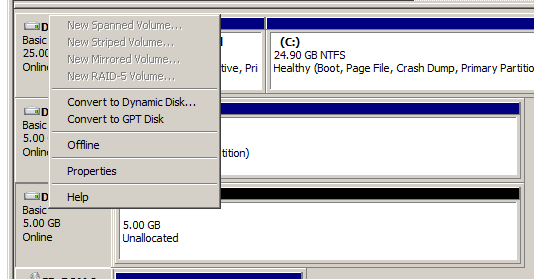
Open Disk Management and right click on the new drive and select Convert to Dynamic Disk.


span_win_1
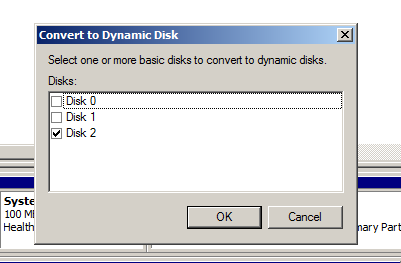
The disk you need to convert will be checked. Click Ok to accept it and convert the disk.
span_win_2

Next you need to convert the disk you want add the space to and complete the same steps. Right click on the drive and select Convert to Dynamic Disk.

span_win_3

The difference in converting the existing disk is you will get a popup warning about converting the disk and not being able to start the operating system from any volume except the boot volume. This is ok, click yes and complete the conversion.


span_win_4
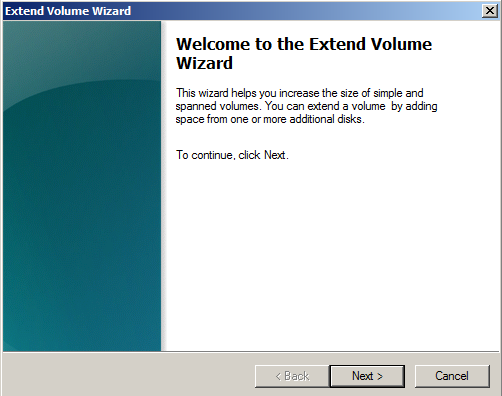
Now the disks are both dynamic we will proceed to extend the volume. Right click on the disk to expand and click Extend Volume. The Extend Volume Wizard will start. Click Next to start the process.

span_win_5
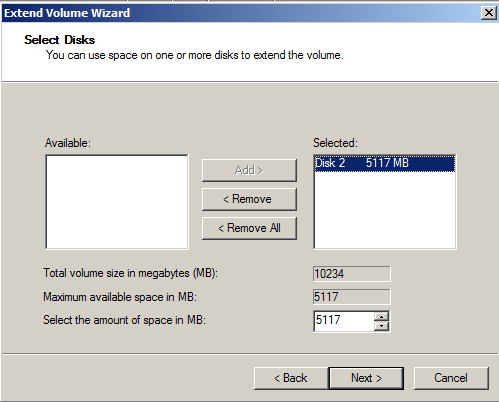
The select disks dialog appears and in the Available disks will show the new disk with the additional space. Click on the disk then click the add button to move it to the selected column, Click next to move to the next step.

span_win_6
Click Finish to complete the addition.

span_win_7
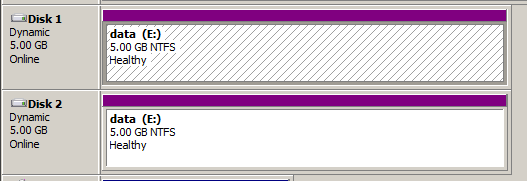
We see the two disks now acting as a single disk.

span_win_8

Repairing a failed Windows 2008/Windows 2008 R2 with ISO ( Specially Physical Servers)

Recreating an OS ISO to Boot the Physical Server with the Drivers

This will be useful if you are about to reinstall/repair a existing physical Servers if in case of any issues:

 Recently I was tasked to repair a corrupted registry on a Windows 2008 Server via iLo but unable to do it beceause the OS CD/ISO image doesnt contain the Drivers of the Physical server's HDD Controller. Booting the Server from the Vendor provided ISO (ex.. HP SmartStart ) will also not provide me an option to repair the existing OS instead i can only start the installation from Scratch.


So i worked out on this solution to encoroporate the Physical Servers HDD Drivers into the ISO of the Windows 2008 R2 after which i was able to boot the Server from the ISO which detected the drivers and i could do the repair process.


 This post will cover exactly how to accomplish the task. of extracting of the Windows Server 2008 R2 ISO and add the drivers needed for the installation.
 

Pre-requisites:
First create the following folders:


C:\temp2\WindowsISO (Unpack your iso to this folder)
C:\temp2\drivers (Add all driver folders in this folder the drivers have to be in .inf format)
C:\temp2\wim (Is a temp folder for the WIM file)
C:\ temp2\WindowsISOdrivers (the new .ISO file will be created here)


Download and install the Windows Automated Installation Kit (http://www.microsoft.com/en-US/download/details.aspx?id=5753)


The Process:
Start Deployment Tools Command Prompt from AIK Deployment Tools > Deployment Tools Command Prompt from Start menu
First we need to show what versions are in the install.wim file. Earlier we stated that this is for Windows 2008 R2 Standard (Full Edition). We can see what is available using the dism command.
C:\Program Files\Windows AIK\Tools\PETools>dism /Get-WimInfo /WimFile:C:\temp2\WindowsISO\sources\install.wim

Deployment Image Servicing and Management tool
Version: 6.1.7600.16385

Details for image : C:\temp2\WindowsISO\sources\install.wim

Index : 1
Name : Windows Server 2008 R2 SERVERSTANDARD
Description : Windows Server 2008 R2 SERVERSTANDARD
Size : 10,510,509,480 bytes

Index : 2
Name : Windows Server 2008 R2 SERVERSTANDARDCORE
Description : Windows Server 2008 R2 SERVERSTANDARDCORE
Size : 3,563,998,339 bytes

Index : 3
Name : Windows Server 2008 R2 SERVERENTERPRISE
Description : Windows Server 2008 R2 SERVERENTERPRISE
Size : 10,510,890,698 bytes

Index : 4
Name : Windows Server 2008 R2 SERVERENTERPRISECORE
Description : Windows Server 2008 R2 SERVERENTERPRISECORE
Size : 3,563,972,455 bytes

Index : 5
Name : Windows Server 2008 R2 SERVERDATACENTER
Description : Windows Server 2008 R2 SERVERDATACENTER
Size : 10,510,997,874 bytes

Index : 6
Name : Windows Server 2008 R2 SERVERDATACENTERCORE
Description : Windows Server 2008 R2 SERVERDATACENTERCORE
Size : 3,564,010,572 bytes

Index : 7
Name : Windows Server 2008 R2 SERVERWEB
Description : Windows Server 2008 R2 SERVERWEB
Size : 10,520,088,768 bytes

Index : 8
Name : Windows Server 2008 R2 SERVERWEBCORE
Description : Windows Server 2008 R2 SERVERWEBCORE
Size : 3,562,616,654 bytes

The operation completed successfully.
As we can see from the output Standard Edition is index 1, so now we can mount the install.wim.
Mount the install.wim file from C:\temp2\WindowsISO to C:\temp2\wim


 c:\> imagex /mountrw C:\temp2\WindowsISO\sources\install.wim 1 C:\temp2\wim


http://lifeofageekadmin.com/wp-content/uploads/2014/02/w2k8iso_1.png

Add Drivers with dism


 cd C:\temp2\drivers\hp
 dism /image:C:\temp2\wim /add-driver /driver:. /recurse 

 http://lifeofageekadmin.com/wp-content/uploads/2014/02/w2k8iso_2.png

Now un-mount the WIM Image
 imagex /unmount /commit C:\temp2\wim

 Create the new ISO file:

 oscdimg -n -m -bc:\temp2\WindowsISO\boot\etfsboot.com C:\temp2\WindowsISO C:\temp2\WindowsISOdrivers\en_windows_server_2008_r2.iso

Burn the result to a DVD and the drivers should be available for detection at installation!

How To Reset the Administrator Password in Windows 2008/2008 R2

How To Reset the Administrator Password in Windows 2008 /2008 R2


Recently had an issue where the local Administrator password was lost for a Windows 2008 R2 server. This post covers how to change the password of the Administrator’s account using the Windows 2008 R2 installation DVD / ISO image.
Boot from the Microsoft Windows Server 2008 R2 DVD / ISO image
From the Install Windows menu, click “Next”.
Select “Repair your computer
In the System Recovery Options, select the Operating System instance that you wish to repair and click “Next”.
Select “Command Prompt”.
At the command prompt, run the following commands:


c:
 cd windows\system32
 ren Utilman.exe Utilman.exe.old
 copy cmd.exe Utilman.exe
Reboot the server allowing Windows to load as normal
At the logon screen, press Windows Key + U.
As the command prompt, enter the following command:


net user administrator NewP$sswOrd
This will set the password for the Administrator user to be NewP$sswOrd (case sensitive).
Closing the command prompt, you should now be able to log back onto the server using the password you have provided in the last step.
Once you have verified you can log on to the server you will have repeat the steps above and boot using the Windows Server 2008 R2 DVD/ISO and run the command prompt again.
Delete the newly created Utilman.exe from C:\Windows\System32
Rename Utilman.exe.old back to Utilman.exe

That’s all there is to it!

How to Fix Local Resources not Mapping with RDP session Windows 2008


How to Fix Local Resources not Mapping with RDP session Windows 2008:


Recently ran into an issue where several servers would not honor the local resources map when running a Remote Desktop Session to a Windows 2008 R2 server. Since this was not controlled by Group Policy I was able to fix the issue. Below are the steps used to correct it.

(read: a check in this box means drive & printer mapping is DISABLED)
  Windows 2008: Click Start, Administrative Tools, Terminal Services, Terminal Services Configuration. On the left pane, select RD Session Host Configuration and then right-click RDP-Tcp within the Connections section of the right-hand pane, then select Properties. In the window that pops up, click the Client Settings tab and make sure that the box next to Drive & Printer is UNCHECKED.

Windows 2008 R2: Click Start, Administrative Tools, Remote Desktop Services, Remote Desktop Host Configuration. On the left pane, select RD Session Host Configuration and then right-click RDP-Tcp within the Connections section of the right-hand pane, then select Properties. In the window that pops up, click the Client Settings tab and make sure that the box next to Drive & Printer is UNCHECKED.

Windows 2003 R2: Click Start, Administrative Tools, Terminal Services Configuration. Select the Connections folder and right-click RDP-Tcp and select Properties. In the window that pops up, click the Client Settings tab and make sure that the box next to Drive & Printer Mapping is UNCHECKED.
And that is all there is to it!

Retrieve WWN’s on WIndows Server 2012 R2 using PowerShell

Retrieve WWN’s on WIndows Server 2012 R2 using PowerShell.


With a single command you can retrieve WWN’s on WIndows Server 2012 R2 using PowerShell.

Open the PowerShell command and type:

Get-WmiObject -class MSFC_FCAdapterHBAAttributes -namespace “root\WMI” | ForEach-Object {(($_.NodeWWN) | ForEach-Object {“{0:x}” -f $_}) -join “:”}